Tuesday

Talk About The WOW Factor!

I am an avid follower of many fabulous photographers and when I saw this on the 'Dashboard' today I was immediately smitten. The details from this amazing wedding were shot by the fabulous Kellan Studios

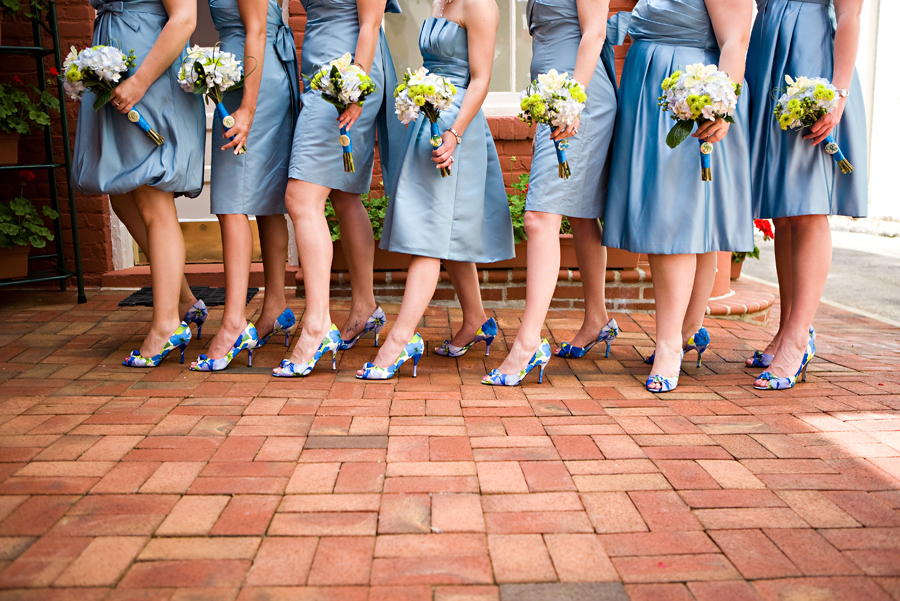
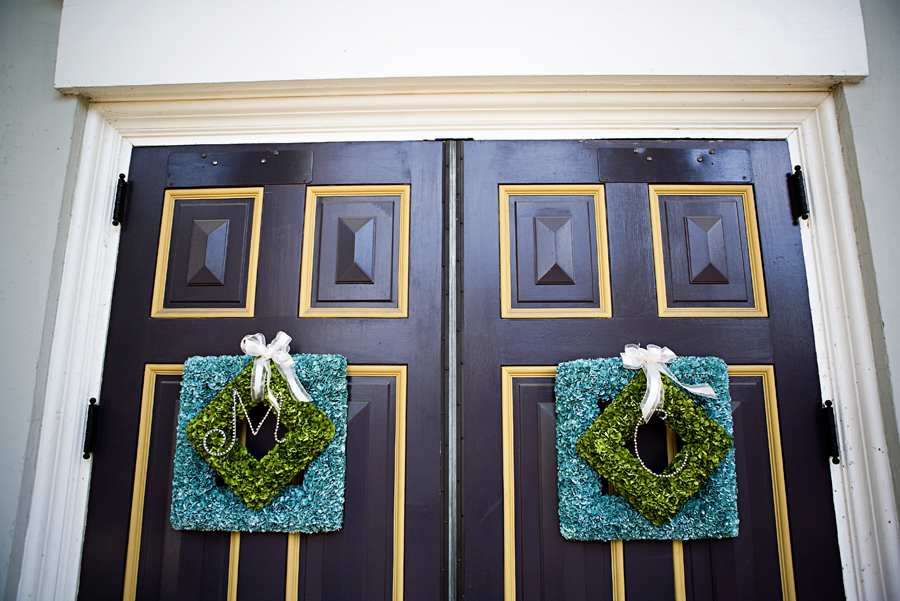
Can we just talk about how amazing the bridesmaids shoes are?!?! AMAZING!

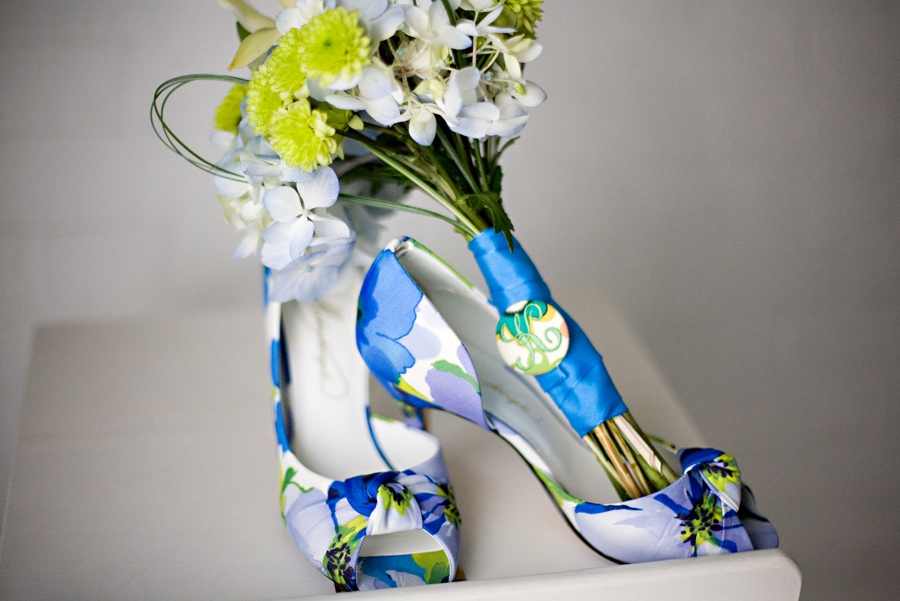
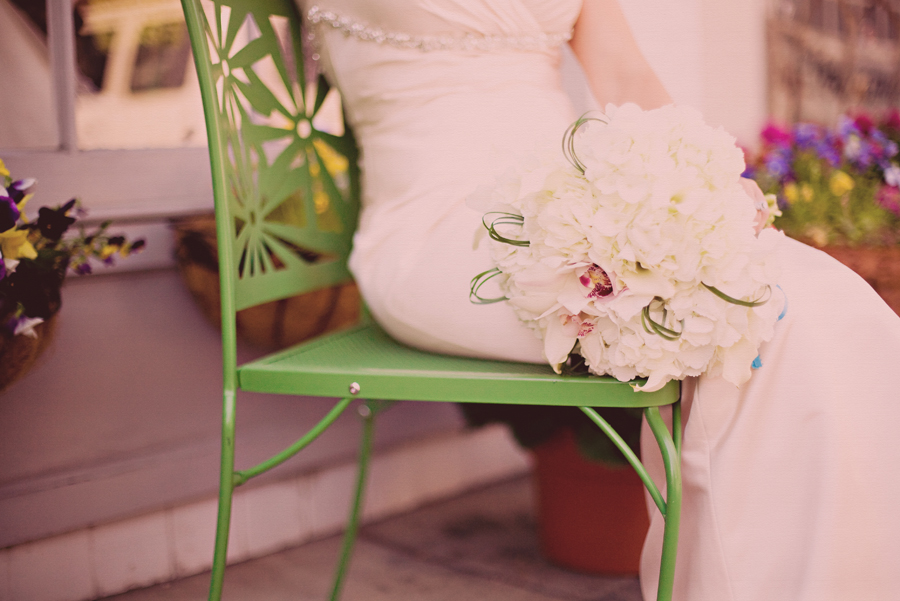
This bride was absolutely stunning and her gown was just as amazing!
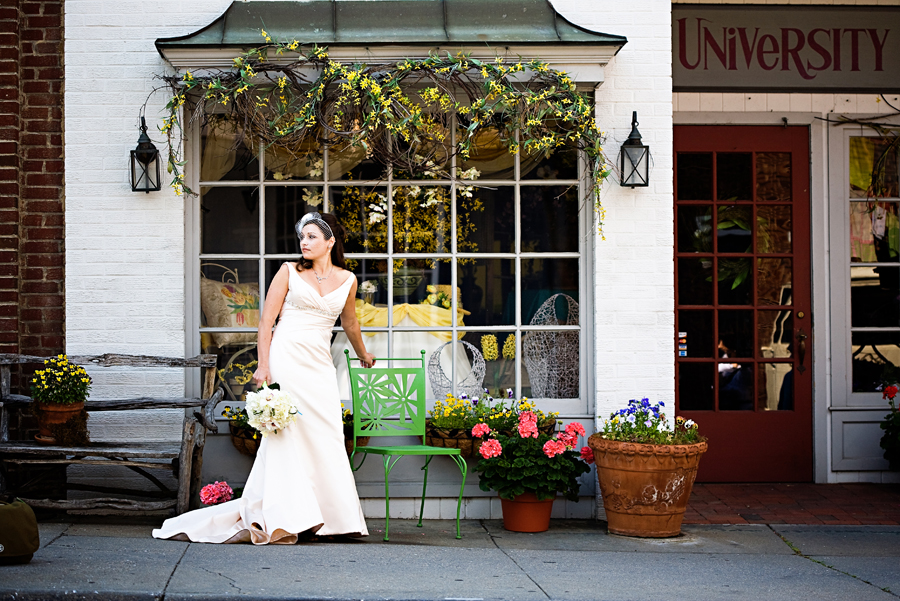
This cake is the epitome of beautiful simplicity...
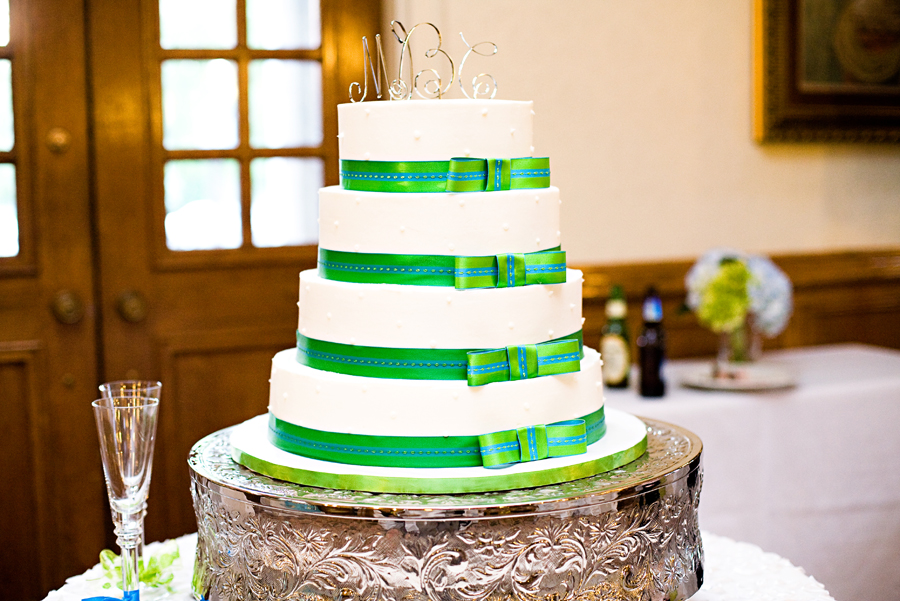
These newlywed shots were all so great it was hard to pick just one!

I just couldn't help but put up this adorable photo of one of the bridesmaids and the flower girl, looks like a magazine advertisement!

Thursday

Edible Silver Beads!

I have always loved the look of these silver beads, or silver dragees, which is their technical name. I can remember as a child my mother would get these at the local grocery store and we used to eat them while we baked. I used to remember thinking that they looked just like BB's so I always thought it was so cool that I could actually eat them!

These days you would be lucky to find these at them at your local grocery store, mostly they can be found at cake decorating/craft store. And now they come in silver, gold, pastels, etc
These turquoise cupcakes are making my mouth water!! The majority of people can make a great cupcake but struggle when it comes to decorating it, so how much easier can this be! Just ice them, sprinkle and enjoy!
This STUNNING cake is covered in the silver dragees in varying sizes...you might break a tooth but it would be totally worth it!

The close up!!!

Wednesday

Tiny 2 Party!

I've always wanted kids, that is nothing new, but now that I found this fabulous party idea from The Creativity Room I can't wait to host a 'Tiny Party' of my own!Beyond the party being great she did a lot of this stuff herself, so as a fellow DIY-er I was smitten. And when she wasn't able to find paper lanterns in the right color she hand dyed them with the food coloring she used on the cupcakes, how smart is that?!?! Just one more reason I say, make it your own, if you can't find it...make it, if it's not good enough...make it better!
She was lucky enough to have a friend make the tiny hot dog and hamburger buns and found the tiny dogs at Albertson's hand made the teeny burgers.
Want to make something commercial look custom, put pretty paper on it! She designed her own patterned paper for the party and used it on the water bottles, food signs, crafts, etc...

Ok...I am ABSOLUTELY IN LOVE with this cupcake idea! She used 2oz. souffle cups, which can be purchased online in bulk, or at your local baking supply shop and made her own buttercream frostin, she was nice enough to post her recipe- find it here!
She also served scoops of ice cream in 3 oz. souffle cups which were to be eaten with wooden spoons! Makes me feel like a kid again, and if she updates with photos of that I will add them.

The little '2's,' polka-dots and 'elle' on the birthday girl's cake were made from colored royal icing. She piped them onto parchment paper & popped them into the fridge to harden them. What a sweet addition ♥
Makes me wish I was turning 2 again, this cake is so wonderful and I bet it was yummy and even better all over the toddlers face!

Tuesday

Who Says your Ladies Have to Wear Solid?

As much as I love a pretty bridesmaid dress, and we I'm sure we've all noticed they are getting better every year (no more turquoise taffeta with fluffy sleeves!!!), the solid ones are just so typical. So if you want to give your BIG day a little punch, put your girls in a patterned dress!

These days so many brides are basing their wedding day theme on a pattern, which makes me so proud! I've never been afraid of pattern and now people are finally jumping on that train.Wouldn't it be nice if you actually saw the pattern that inspired your wedding in your group photos, instead of just on your reception tables? I think so!
So don't be afraid of adding a little (or A LOT of) pattern to your special day to pack a memorable punch for your guests.
Photo by: LuLuBelle's Blog
If you don't think you can handle all over pattern, or think your girls won't be flattered in full patterned garb, try adding a small punch. These dresses have a small band of floral for all the punch without be so out of the ordinary.

Monday

Etsy Find Monday: Cupcake Banners!

So I found these on Etsy and thought, who doesn't love a delicious cupcake?!?! Now...who doesn't love a CUTE delicious cupcake?!?! No One!! These adorable cupcake flags are from the ButtercreamBea Etsy Shop and you can get 12 flags for only $4.50!

These are great for small parties or even your wedding! These days so many couples are choosing to do a 'CupCake Cake' instead of the typical cake so I think these make it extra personal. I especially love these multi colored flags below to give some interest
And, if any of you are interested I could post the tutorial for these as my 'DIY Project Wednesday' let me know if it's something you'd like to see!

Friday

1st Favorite Wedding of the Week FRIDAY!

Since this is my 1st Favorite Wedding of the Week Friday I knew I had to make it good, so I turned to a brand new blog I found, 'Our Labor of Love- The Blog', to help me make that happen.The Indian style nuptials of Renny & Binu were nothing short of a fantasy! Golds, Reds, Oranges & Pinks collided in a way that was nothing short of majestic...

Here are just a few of the photos from their magnificent wedding...
I thought this picture was just so cute and fun, this is how the day should be relaxed and happy.
If you didn't believe me when I said the colors were breathtaking you will now!
The bridal party stunned in traditional garb in a burnt orange and gold. Beautiful...
I saved my favorite for last..this photo on the right of the veil is just magnificent.

Thursday

How To: Steamer Trunk Re-Vamp!

So I've had quite a bit of inquiries about the process of re-vamping my steamer trunk,
so instead of just responding on the comment posts I thought I'd make a whole blog post on the steps I used to refinish my trunk!

Items Needed:
- Steamer Trunk!!!
- Box Cutter
- 3 Old Rags
- Wood Stain
- Heavy Duty Rubber Gloves
- Clear Coat (optional)
-Rustoleum Black High-Gloss Paint
- 2 Small Flat Bristle Paint Brush
- 4, 2 1/2 wooden legs

- Fabric of your choice!

Directions:
1. Find the perfect Steamer Trunk -they can be found at garage sales, thrift/antique stores, flea markets, and (sadly) even in people's trash piles!
And for me, the worse the better!!
2. Use a box cutter to cut along all of the edges to remove the fabric from the trunk. This is much easier than attempting to rip the fabric or remove the brackets.
3. Once done, use a moist old rag to wipe down the entire trunk! Mine was covered in a weird turquoise powder that stained the wood, I think it was from whatever they used to dye the old fabric. I was lucky enough that it rubbed right off!

Doesn't it look 100x better already!?!
4. Now comes the really fun part, the wood staining! I used Minwax's Dark Walnut Stain and loved the results. I used one of the small flat brushes to brush on the stain around the metal perimeters, as to not accidentally stain it. Once I did the perimeter I used the tip of an old rag to rub on the rest of the stain, in that area.
Remember, always rub WITH the grain, not in circles AND work quickly! Especially with using the brush and a rag make sure you blend the painted stain with the stain that was rubbed on so it is a consistent color. If the color isn't deep enough, do another coat!
5. Once the staining process is done, you can choose to clear coat it, however, I chose to leave mine because I loved the way it looked as is. Next comes the trim work. Using the other small flat brush paint all of the trim work with the Rustoleum paint, I used highgloss black but you could use a dark brown, gold, silver, etc... Just be prepared to spend a few hours and will need some good pain pills for your back hehe.6. I chose to add feet to my for a little added height, and because it will be placed on carpet and didn't want to have a giant rectangle on the floor if I chose to move it. I purchased them at Home Depot for around $2/a piece, and painted them in the same black paint I used for the trim. To attach them I drilled four holes in the bottom and used the given bolts, but had to purchase some matching washers and lock washers to complete the installation. Just make sure you do this BEFORE you add the fabric to the inside!!!
7. Now comes the fun part, picking your fabric! I chose to do a big punch of color, but you could choose whatever makes YOU happy. It doesn't match anything in my house, but that is what I liked. Every time I have people over for game night and they get a board game out of my trunk it will be such a surprise, which is what I wanted! The fabric I chose was a purple and navy print satin that I got for a whopping $6/yard at Joann etc...Hooray!
8. Now comes the harder part, lining the inside with fabric. I chose to use hot glue to affix the fabric since it was so delicate, but if I was using a heavy cotton or canvas and staple gun would have worked just fine. The hardest part I found was getting all of the corners done perfectly, it takes a lot of patience but the end product was totally worth it. To do the top edges, so that no raw ends were showing, I folded the fabric over and glued, but if you are so inclined you could hem the pieces before hand.9. Now the last part...ENJOY IT, SHOW IT OFF & HAVE A PARTY!!!

I hope this tutorial helped and if you decide to tackle your own project please send me your Before & Afters, I'd love to show them off on the blog!


Featured on Design*Sponge!!!

I'm so excited to announce that my Steamer Trunk Re-Vamp was featured on Design*Sponge's 'Before & After!'
I am already an avid follower of the Design*Sponge blog because it keeps me motivated and gives me a ton of inspiration! So the idea that someone may draw inspiration from something I've done is a great feeling, it IS why I do what I do. I'd love it if you would leave me some love here and on the Design*Sponge blog !!

Rolling Out 'Chic Maps by Nikki' Blog Days!!

I have decided that to keep my blog new and fresh,
I need to implement some weekly blog days, so here goes!!!


Monday - Etsy Find of the Week

Wednesday - DIY Project of the Week (Wedding, Home, Design, etc...)

Friday - Favorite Wedding of the Week


So now comes the part where I ask for your help...what do you think?
Are these things you'd like to see weekly or do you have any suggestions of other
or additional stuff you love seeing on my blog.

Submissions:
If you or your business fall into one of these categories and would like me to showcase your work just send an email with photos and information to nikkibiallas@yahoo.com


Tuesday

Great Bridesmaids Gift UNDER $25!!!!

I love the look of these antique inspired bracelets from The Wrist Candy Collection, on Etsy
Even the name is beautiful, Ophelia in Pearls, and this beauty is only $18! I was immediately drawn to these adorable pocket mirrors! At MadisonCraft have over 150 different designs, perfect to match with your wedding colors! And at only $4.50 you could add it in with a 'day of' tote for your girls! This adorable design is 'Bird on a Branch'
The pocket mirror could be added to an adorable bag like this Purple and Cream Vintage Lace Clutch from BadKittyHawaii! At only $20 you can afford to add some goodies that your bridesmaid's will surely love.
Although the photo I found is a little blurry, you can still see the idea is beautiful! Many women, like myself, love the idea of a flask but they are always so man-ish! But this damask flask beauty from DarlingDamask is not only a stunner but at $15 it won't break the bank. This Etsy Shop also carries anything damask: runners, cloths, napkins, boxes...name it they've got it!I thought this t-shirt was so great! It is a nice change from the typical 'Bridesmaid' tops that can be found anywhere. I found this one on PinkVelvetPress' Etsy Shop
this Bride & Co. Top... only $15.99! They also come in tank tops :)

Wednesday

Think Outside of the ...Vase?

Anyone can go and buy a glass vase and stick some store bought flowers in them,
but not only can it get a little spendy ... it has no personality!

I mean, can you deny the simplicity and beauty of a tin can full of ranuncules? I sure can't!So, do you ever eat canned veggies? Or buy condiments in glass jars? If you answered, YES, you have all you need to make custom flower arrangement!This set up was done with combination's of clear jars. They range from OJ Jars, Mason Jars, Oil/Vinegar Jars, Relish Containers, etc! Honestly I think even something as simple as an emptied jar of mayo would be beautiful!
Okay, Okay...I know this isn't a flower arrangement, but since we are on the topic of original uses of jars I thought these mason jar hanging candle holders are spectacular. Keep an eye out for photos of our new place once we move because I have special plans to use these.

Enjoy!